Hinged CRT Generator
User Guide
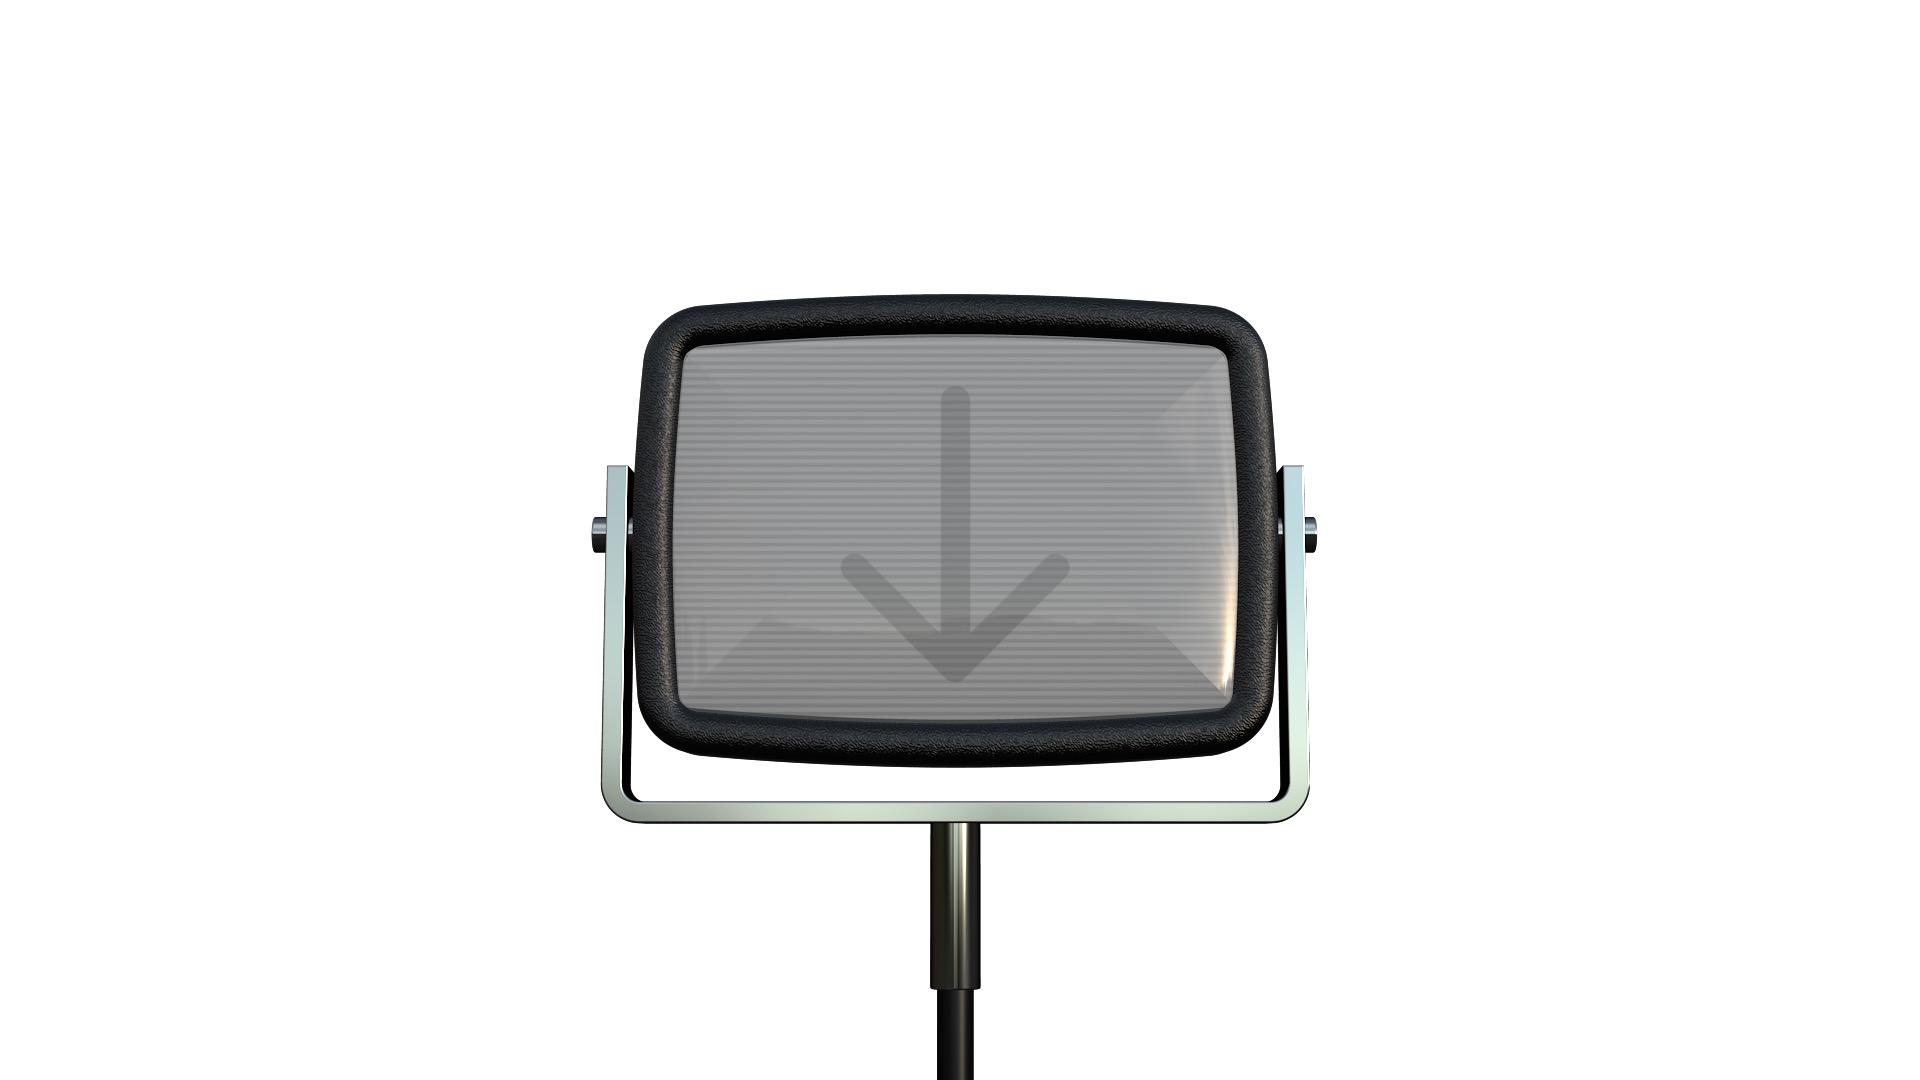
I want my LiveType® TV!
This is not a complicated effect. It’s basically a drop zone with window dressing. This effect requires the installation of a special font used to create the 3D text effect graphics (included with the plugin download).
This generator is auto animated via the optional Build In and Build Out parameters. The Build In animates the CRT up into view with a turn (just like the original). The Build Out turns the CRT and pulls it back out of the scene. There are other controls that can be keyframed to customize animations however you like and they can even be used to supplement the default animations.
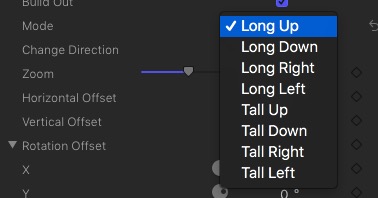
There are sixteen default animations, eight standard and another eight with the turn direction reversed. CRT is animated from scene edges (top, bottom, right and left) and the Long descriptor means horizontal orientation of the CRT while Tall means vertical. The turn for all orientations is screen up to face front. The turn, if Change Direction is checked is screen down to face front.
First trick:
Set up the Hinged CRT generator as if it were a completely finished effect including all keyframed animations. Blade through the middle of the generator (all keyframes will remain intact) and change the Build Out animation to move in the opposite direction by selecting the Change Direction checkbox.
Parameters:
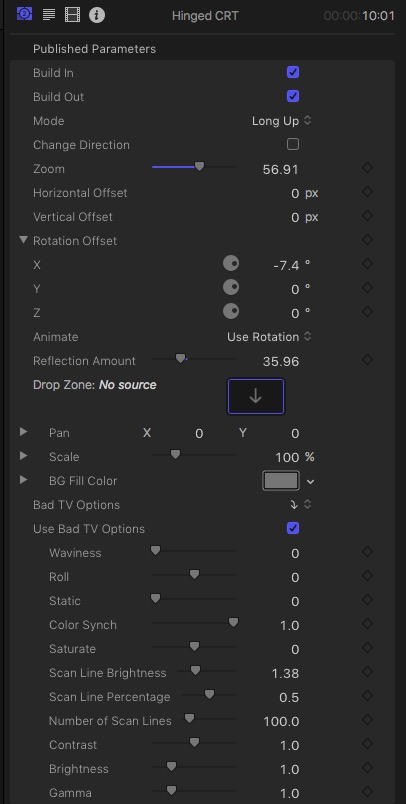
The Zoom slider will increase the size of the CRT to slightly larger than 1920 x 1080. For larger format media, use the Video Inspector Scale All parameter. It will still look great!
The Horizontal, Vertical and Rotation Offset parameters can be used to customize animations, even the Build In/Out animations already in progress! Rotation reorients the entire Hinged CRT model, not the CRT in the hinge mount.
The front screen “glass” effect looks a little lame… due to the nature of 3D surfaces in Final Cut, there’s not much that can be done. A Reflection Amount parameter has been added to help reduce the otherwise sharp edge effect in the glass. Another technique to disguise its appearance is to rotate the CRT about -7º to shift the shine slightly and smooth out the edges.
The next section of parameters deals with the Drop Zone. Select the Drop Zone source well and FCPX will present a “two-up” display in the Viewer. Select your source media from the Event browser. If your media is to be video, then as you mouse over the video in the Event Browser, the cursor will change to a pointing finger and you should see a skimmer bar. Keep an eye in the viewer and where you click on the Event thumbnail will select your first frame of video to be used. If choosing an image? It doesn’t really matter where you click.
The Drop Zone can also be filled with any kind of video you create in the storyline. You can combine video, photos, titles and generators just as you would for your normal video presentation. Bundle all the pieces to be used into a Compound clip and select the starting frame from your compound clip right in the storyline. Once you fill a Drop Zone with media in the storyline, you may simply delete that media from the storyline and the drop zone will retain what was placed in it. This is especially convenient if you need to simply place Title text in the CRT without having to make a compound clip. Once loaded, reuse the title for another instance of Hinged CRT or simply delete or “hide” the title (typing the V key on any kind of selection will toggle its “visibility” [or turn on/off audio as well.])
There are Pan and Scale controls to help align and/or fit video into the CRT screen. You may also changed the background color of the dropped material (e.g. text) with the BG Fill Color. The color selected will appear slightly different due to the design of the 3D model. Color “richness” can be compensated with the Contrast, Brightness and Gamma controls at the bottom of the parameter list.
Bad TV options are on be default but minimally used (scan lines). Unchecking Bad TV will present a “straight” media image with no “old TV” effects.
Waviness is a good way to provide “glitch”. Keyframe a jump into Waviness to last about a second and jump back out (reset to 0).
Roll is best used by setting from one extreme and keyframing to the other depending on the direction of the roll. That action will give two “flips” through the image and looks convincing even when the Drop Zone media is scaled down (creating a rather large border between the two rolled images).
Static, like waviness, is best used in moderation, but the choice for all of these features is yours!
Reducing Color Sync will give the image color edges (faded red and cyan – probably looks somewhat “cool” with red-cyan 3D glasses :D).
Old TVs were very “flexible” in their display of onscreen images — the Saturation control can help with that little bit of realism as well.
The next three parameters deal with scan lines. You really have to play with them in conjunction with each other. The number of effects achieved cannot be enumerated here.
And last, the previously mentioned Contrast, Brightness and Gamma Controls. These can be used to adjust the actual dropped image in the Drop Zone.
Have fun!
[LiveType® is a registered trademark of Apple, Inc.]