You will need FCPX 10.2.x in order to make use of this tip.
[ QuickTools has been upgraded, enhanced and greatly expanded by SC KeyFX! ]
I’ve created dozens (if not more than 100) titles for FCPX, but for my own personal use, 95% or more of the time I just simply add a Basic Title to my storyline as needed. If you’re familiar with Basic Title (and you should be!) you’ll know that there are no parameters available. One of the features of Basic Title is that the Title Background is absent. This Title Background is a placeholder used in developing Titles in Apple Motion to represent the content of the storyline in FCPX (or more accurately, the content of *everything* video/image related beneath the title in the storyline). Something to keep in mind as I’ll get back to that later.
The behavior of Basic Title in the storyline is that you can click on the text in the canvas and drag it around to place it in the scene. You cannot keyframe the motion to create an animation in this way. Keyframing animation is not the important point of this story, it’s just a point of note.
What this article is about is a “trick” to be able to *rotate* the text in 3D space to arrange it in the scene. It should work in any Title or Generator that includes editable text in the canvas.
With the Title selected in the storyline, click on the Text tab of the Inspector. Activate 3D Text (you can turn it back off afterwards!)
Go back into the canvas and mouse over the text area. You should see an outline appear:
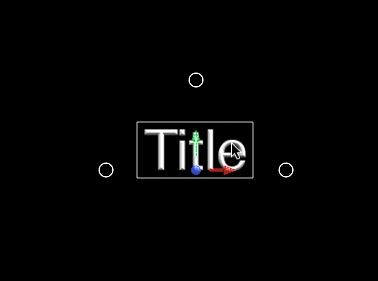
Click *once* inside the rectangle. You should see a 3D control appear:
Clicking and dragging inside the circles will allow you to rotate the text in 3D space. The top circle is the X-axis rotation (a red “great circle” will appear when activated). The left circle will be the Y-axis rotation (its great circle is green). The right circle will be the Z-axis rotation (and its great circle is blue).
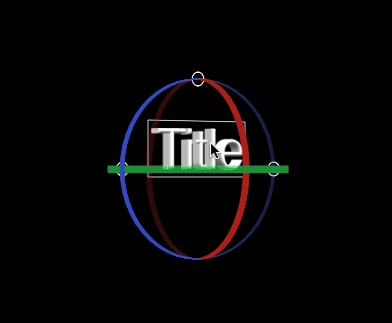
If you hold down the command and option keys, you can coax all the great circles to appear and stay on allowing a floating rotation control with the mouse in all directions at once.
You may not like or need a 3D look to the text so you can turn 3D Text back off to restore the 2D text and the orientation will remain as in the example frame below. This is a great tool to help align text along perspective planes inside video. It’s not perfect but seems to be convincing enough most of the time. To make it work better — if you have Motion — you could publish the Camera: Angle of View parameter and possibly the Camera: Distance (Position.Z) to emphasize parallax views.
Integrating Titles Into the Scene
The second part of this article is about taking the technique to another level, that have having it appear integrated into the scene — to have action move in front of the text. Take a look at the examples in this video:
QuickMask is part of the QuickTools Effects sold on this site and on my store on Creative Market. The mask only works in this fashion on Titles that have their Title Background placeholder disabled. You can download a *FREE* Basic Title with Parameters title/template here (http://sight-creations.com/free_stuff/sc_Title_with_Params.zip) which will allow you to animate the title in the canvas without having to use the Transform parameters for the entire “layer.” You are able to keyframe rotation using the onscreen 3D controls, and although the position parameters respond to onscreen control movement, you must manually keyframe the Position parameters (for some unknown reason) as onscreen control changes for position are ignored in FCPX.
The power of QuickMask is based on the newly included feature of “effects masks” in FCPX. For an overview of Effects Masks watch this video:
As it turns out, effects can be used on Titles as well and if a title has no background placeholder in use then this visual effect can be accomplished with QuickMask. The masks are easily animated/keyframed making creating the effects shown in the top video possible. The downside is that you have to manually “track” the masks. The upside: manual tracking is usually faster (although more tedious) than automatic tracking — and considerably less expensive! Note: since this technique only works on Titles with no Title Background layer, the Color Mask option is useless (unless you use it directly on the text).
—F•X
Keep up to date with Sight-Creations on Twitter and Facebook.