Tag: Tip

Keying "inside and outside" on the same footage

Keying Inside and Outside

You do not need a Motion Template for this effect!

Scene: You have a green screen clip and you want to replace not only the green screen but also the subject with replacement media.

I came across this problem on Apple’s discussion board (FCPX forum) and thought it was an interesting problem. It’s actually quite simple, but there is a catch if you don’t know what to look for.

For this demonstration, I will be using a free sample (practice) green screen clip available from hollywoodcamerawork.com. The download is in the Godiva Medium section about halfway down the page. Here’s a frame:

HCW GodivaMedium

This is a relatively awful green screen. The green isn’t “even”. It is very difficult to pull a decent key especially in the area of the sheer fabric. It is, however, a very good clip to learn how to key and if you successfully pull a good key, then you will have learned something useful!

The effect I want is to have our model replaced with fireworks as a silhouette effect and the green background replaced with an icy waterfall (fire and ice 😉 ). Two mattes from one clip.

keynoteTrace

If this question hadn’t been asked, this is not something I would have thought of by myself… It’s actually rather cool!

How this is accomplished is rather simple:

1) apply they keyer to the green screen footage — invert it! — and overlay it over the fireworks clip.

(When you invert a keyed green screen, you get the original green screen back as everything that is not green is masked!)

2) select the green screen clip and fireworks clip and make a compound clip.

3) apply the Keyer to the compound clip and overlay it over the icy waterfall clip.

Pretty simple provided 1) you get a good key and 2) you know how to get around the non-transparent “white out” where the green screen used to be. This is what it looks like:

whiteoutKey

This is a WTF moment. It’s supposed to be transparent. So what happened?

It turns out that the provided Keyer effect in Final Cut Pro automatically sets a 46% Spill Level (I don’t even know what this is because it is separate from the Spill Suppression — it seems to be the “primary” spill removal tool; it’s documented that it will fill the green with a light gray color instead of transparency.) The solution at this stage is to simply set the Spill Level parameter to 0% and that will clear out the white-out to transparency again.

When completed, you will end up with a compound clip containing your green screen footage (with inverted key) over the media used to fill your subject, and placed over another clip used to contain the media used to replace the green screen. It will look great! And, you didn’t need to use a special Motion template to accomplish it.


That said 😉 —

If you use SC KeyFX scKey Replace, you only need one clip. “scKey Replace” allows you to select any color (use shift-click and/or drag to include more) very much as you would in a “paint” application like Photoshop. You can stack the effects on a single clip and use the drop zones to fill the parts. There is a feature that will allow you to blend the replacement media with the original media using Blend Modes if you wish. With it, you can pull off an even more interesting effect of lighting up your subject with the filling media.

In the first frame: throughout most of the play through, the subject model is silhouetted. However, when the “flash” is close to her face, you can see the fireworks “light up” her face briefly. It’s really impressive to see!

screplace1Model’s face is silhouetted

screplace2Model’s face shows some color detail. (It is more obvious in playback.)

You cannot get this kind of effect from the basic Keyer effect since the blend modes provided by scKey Replace are not available in Keyer.


See SC KeyFX Tips for more information.

Use 3D Titles for the 3D orientation onscreen control

A Simple Trick with FCPX Titles

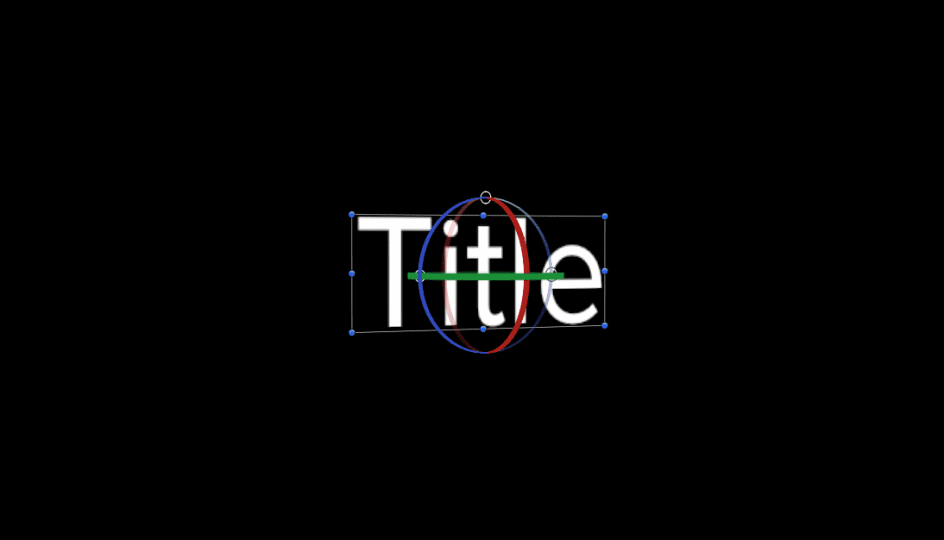
A Simple Trick With FCPX Titles

Rotating Title text in FCPX

You will need FCPX 10.2.x in order to make use of this tip.

[ QuickTools has been upgraded, enhanced and greatly expanded by SC KeyFX! ]

I’ve created dozens (if not more than 100) titles for FCPX, but for my own personal use, 95% or more of the time I just simply add a Basic Title to my storyline as needed. If you’re familiar with Basic Title (and you should be!) you’ll know that there are no parameters available. One of the features of Basic Title is that the Title Background is absent. This Title Background is a placeholder used in developing Titles in Apple Motion to represent the content of the storyline in FCPX (or more accurately, the content of *everything* video/image related beneath the title in the storyline). Something to keep in mind as I’ll get back to that later.

The behavior of Basic Title in the storyline is that you can click on the text in the canvas and drag it around to place it in the scene. You cannot keyframe the motion to create an animation in this way. Keyframing animation is not the important point of this story, it’s just a point of note.

What this article is about is a “trick” to be able to *rotate* the text in 3D space to arrange it in the scene. It should work in any Title or Generator that includes editable text in the canvas.

With the Title selected in the storyline, click on the Text tab of the Inspector. Activate 3D Text (you can turn it back off afterwards!)


3D Text - not selected
3D Text Select

Go back into the canvas and mouse over the text area. You should see an outline appear:

Title Selection

Click *once* inside the rectangle. You should see a 3D control appear:

3D Title OSCs

Clicking and dragging inside the circles will allow you to rotate the text in 3D space. The top circle is the X-axis rotation (a red “great circle” will appear when activated). The left circle will be the Y-axis rotation (its great circle is green). The right circle will be the Z-axis rotation (and its great circle is blue).

3D Title Control

If you hold down the command and option keys, you can coax all the great circles to appear and stay on allowing a floating rotation control with the mouse in all directions at once.

You may not like or need a 3D look to the text so you can turn 3D Text back off to restore the 2D text and the orientation will remain as in the example frame below. This is a great tool to help align text along perspective planes inside video. It’s not perfect but seems to be convincing enough most of the time. To make it work better — if you have Motion — you could publish the Camera: Angle of View parameter and possibly the Camera: Distance (Position.Z) to emphasize parallax views.

Integrating Titles Into the Scene

The second part of this article is about taking the technique to another level, that have having it appear integrated into the scene — to have action move in front of the text. Take a look at the examples in this video:

QuickMask is part of the QuickTools Effects sold on this site and on my store on Creative Market. The mask only works in this fashion on Titles that have their Title Background placeholder disabled. You can download a *FREE* Basic Title with Parameters title/template here (http://sight-creations.com/free_stuff/sc_Title_with_Params.zip) which will allow you to animate the title in the canvas without having to use the Transform parameters for the entire “layer.” You are able to keyframe rotation using the onscreen 3D controls, and although the position parameters respond to onscreen control movement, you must manually keyframe the Position parameters (for some unknown reason) as onscreen control changes for position are ignored in FCPX.

The power of QuickMask is based on the newly included feature of “effects masks” in FCPX. For an overview of Effects Masks watch this video:


As it turns out, effects can be used on Titles as well and if a title has no background placeholder in use then this visual effect can be accomplished with QuickMask. The masks are easily animated/keyframed making creating the effects shown in the top video possible. The downside is that you have to manually “track” the masks. The upside: manual tracking is usually faster (although more tedious) than automatic tracking — and considerably less expensive! Note: since this technique only works on Titles with no Title Background layer, the Color Mask option is useless (unless you use it directly on the text).

—F•X

Keep up to date with Sight-Creations on Twitter and Facebook.

FCPX Commands - Play Rate

FCPX Editing Tip — J,K,L and beyond

FCPX Editing Tip — J,K,L and beyond

Most people know that the J, K, and L keys can be used to skim video in FCPX. It’s been around since… Quicktime Pro (I don’t even know which version!) The ‘K’ key always stops playback. Typing ‘J’ will play in reverse in whatever frame rate your project is [i.e. -1x time.] A double tap on J will set playback at -2x speed. Triple tap: -4x speed. Up to 6 taps on the key will send the speed all the way up to -32x playback. That’s fast. The same is true using the ‘L’ key, except in the forward direction.

The problem is, if you 5-tap the L key (16x forward) and you want to slow down to 2x forward, you have to Stop (K) and restart with a double-tap on the L key.

There is another way.

Type Command-Option-K to call up the Command Editor.
In the Search field at the top right, search for “play rate” (without the quotes, of course).

In the Command List > Command section, you will see a listing of all the play rate speeds: Play Rate -1, Play Rate -2, …,
Play Rate -32, then Play Rate 1, Play Rate 2, etc… to Play Rate 32.

You can assign any available key combination that you like, that is convenient for you, but I’d like to suggest:

Reverse Speeds:
Play Rate -1     →   Command-Control-Shift-keypad 1
Play Rate -2     →   Command-Control-Shift-keypad 2
Play Rate -4     →   Command-Control-Shift-keypad 3

Play Rate -32    →   Command-Control-Shift-keypad 6

and
Forward Speeds:
Play Rate 1     →   Command-Option-Control-keypad 1
Play Rate 2     →   Command-Option-Control-keypad 2
Play Rate 4     →   Command-Option-Control-keypad 3

Play Rate -32    →   Command-Option-Control-keypad 6

Select the Command and hold down the modifier keys and type the number value on the keypad (laptop users use the regular number keys.)

The spacebar will always stop playback as well as the K key.

Now when skimming through your video, you can change speeds in one action and go immediate from one speed to another without having to stop and restart the process each time you want to change speeds.


FCPX Commands - Play Rate
comand editor

Keep up to date with Sight-Creations on Twitter and Facebook.