
Sliding Thirds User Guide
A title effect for FCPX
Description
This effect is for 16:9 media. You can use it for other aspect ratios, it simply will not look as good.
Sliding Thirds title is a simple yet powerful effect. Even though it is being referred to as an “effect”, it is actually a Title plugin for FCPX. And even though it is a “title”, no text has been provided for use. Sliding Thirds is very much like an adjustment layer you can apply to your storyline to provide animation support for any other kind of title you would like to apply. Its effect can be extended greatly by “stacking” instances of the Sliding Thirds title in your storyline. (Examples below demonstrate a “pyramid” stack, an “offset” stack, and “straight” stacks.) Directly stacking one upon another will double its effect.
The default setting is to have the left side panel animate into view for a little over 1 second (including the offsetting of the “canvas” if set). At the end of the title (about the last 1 second) the panel slides back off and any offset of the canvas is restored to its original position. The title can be as short as 2 seconds and 10 frames long or as long as your entire project. Panels are activated by checkbox option. It is allowed to not use any panels and only use the Horizontal and/or Vertical Slide to move what is on the canvas. Sliding Thirds can be used simply to “push” anything on the screen by up to one third of its dimension. Stack another Sliding Thirds on top and move everything another third, including whatever you add to the Sliding Thirds title underneath. Stack as many as you like to keep moving panels across the screen.
See the demo video (below) for a variety of effects than can be accomplished with this single simple title.
Horizontal/Vertical Slide: Values default to 0. Sliding left moves the screen (storyline) media to the left. Sliding right moves the screen media to the right. Values go to 100% with minus or positive indicating direction of movement (negative vertical is downward). A 100% offset will move the screen media just far enough so that the edge of the media will match the opposite edge of its corresponding panel (if used). Offset values of 0 will not move the screen/storyline media. The usual value of 50% will move the storyline media just far enough to maintain its center to the center of its new visual space between its panel and the outer edge of the video. This value may be keyframed to customize its appearance as well as to make adjustments when stacking Sliding Thirds. Keyframing can be used to override the built in animation timing. An example of this is demonstrated in the Demo video below.
Fill Color: The color used for all panels. There is no mix and matching colors for panels, they are all the same for one instance of Sliding Thirds.
Fill Opacity: Sets the transparency for all panels.
Use Left/Right/Top/Bottom Panel: Checkboxes allowing selection of which panel appears. They can all be used or none of them can be used. If you would like to build a “reveal” effect using only Horizontal/Vertical Slides, you must combine the Sliding Thirds title with a clip in a compound clip and place the media to be revealed below the compound clip in the storyline. Without using a compound clip, Sliding Thirds will move *everything* beneath it including clips beneath the storyline (but not audio!)
Drop Shadow: Typical drop shadow controls; should not need explanation.
Drop Zones: There is a drop zone for each panel. The drop zone is sized to exactly fit the panel it belongs to which will make media placement convenient: the center of the dropped media will always align with the center of the panel. Included with each drop zone is a Pan parameter which allows adjusting the positioning of the media within the panel; and a Scale parameter which normally will be used to “shrink” one of the dimensions to fit more of the view into the panel, e.g., scaling the X dimension to less than 100% to squeeze the media horizontally for Left/Right panels, or for shrinking the Y dimension to fit vertically into Top/Bottom panels.
Added recently:
Animate Intro/Outro: The animation only determines the appearance of the panels. Turned on, the panels will slide in. Otherwise they will instantly and continuously be “on” for the duration of the Sliding Thirds title in the storyline. Sometimes it might be useful to have the Outro turned off if you simply want to move a clip in one direction and not have it be returned to its original position (usually when stacking multiple Sliding Thirds…) It’s at the bottom of the parameter list to mostly be “out of the way” and there if you need it.
Parameters:
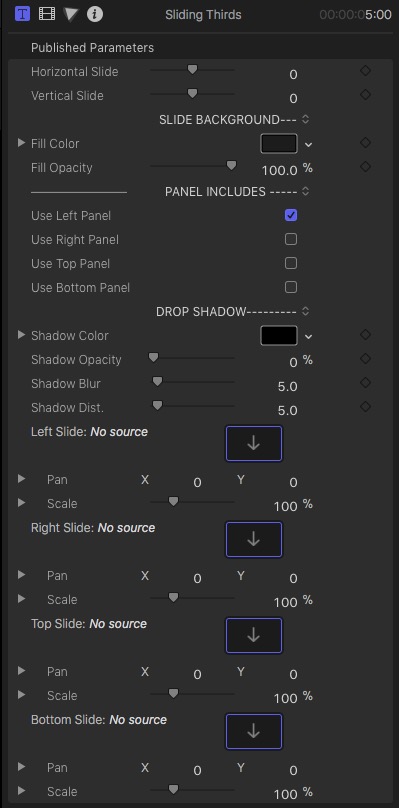
Basics
Sliding Thirds consists of two parts: The sliding background panel and the storyline content. Storyline content means everything (media, generators, titles, or anything else you can add to your project) underneath the Sliding Thirds title instance. A Panel is a complex background widget consisting of a solid color and/or drop zone content.
Panels are designed basically as a solid color background for any other type of content you wish to add above the Sliding Thirds title. Panels may be any color. Panels may have any level of opacity, they can even be made invisible.
Drop Zones can contain anything. Media, other titles, other generators, and compound clips of any other combination of media, generators, titles, etc. Using Drop Zones that are filled with titles or other transparent background media still display the background color solid panel depending on your settings. When using another title for any of the four drop zones available, you may create a title in your project anywhere in your project, then select the drop zone source well in Sliding Thirds and select your (temporary) title and Apply. Once the content is added to the drop zone you may delete it from the storyline or change your title to be reused in another drop zone. When you’re done with adding drop zone content, you may delete any item from the storyline that you created to place in the drop zone.
Drop Zones in Sliding Thirds are designed to have the aspect ratio of the panels on which they are applied. When designing titles or generators for adding to a drop zone, design for the center of the screen. The center relationship is maintained within the custom drop zones. You can offset and/or scale the drop zone media with the supplied parameters for each.
Use as a Reveal effect
Panels are optional. The left panel is on by default but may be turned off. The storyline media may be animated (up to 1/3 the screen in either direction per instance of Sliding Thirds [if stacking is used]). If all the Sliding Thirds titles are combined with media immediately below their instances into a compound clip, then any other media below the compound clip will remain stationary. Combining the animated compound with stationary media will create a reveal effect. This may also be used for basically any kind of media: to reveal a title or reveal another clip. Turning off the Animate Outro option with three stacked Sliding Thirds instances can be used as a slide transition.
“Fully Loaded”
One Slider Thirds title. The ice cream sundae clip is in the viewer and all four panels have their drop zones loaded. When the drop zones are empty only the panels are visible provided their opacity is enough to make them seen.
Upper and Lower Thirds are always dominant. When using color panels without drop shadows, it is possible to make L-shaped fill regions. When using Stacking (see below), for example for a 2/3 slide, Drop Shadow seams can be eliminated by applying a drop shadow only to the lowest instance.

Stacking
As stated, Sliding Thirds will move everything underneath its duration. You can add basic titles (or any other type of media) over the storyline and Sliding Thirds will gather it all up and slide it (by the Horizontal/Vertical Slide amount). In the example below, there is a Basic Title over the storyline video. About 1 second after its appearance, a Sliding Thirds “instance” is placed. The Basic Title text will slide with the storyline media as if it were part of the scene. If the Sliding Third has video in its drop zone, then that video will slide into view to “fill the gap”. When the Sliding Thirds instance ends, the media will slide back to its original position.
Stacking more than one Sliding Thirds will continue to slide media — including a Sliding thirds panel or drop zone that is underneath it. The maximum slide for each instance is 1/3 the screen. Two instances will slide 2/3s of the screen and so on. More than three instances will begin to slide panels off the screen at the other end — but they will slide back on when Sliding Thirds title ends over the instances below it. In the case of “Offset Stacking” as shown below, the returning media will “collapse” behind the last (topmost) instance until finished.
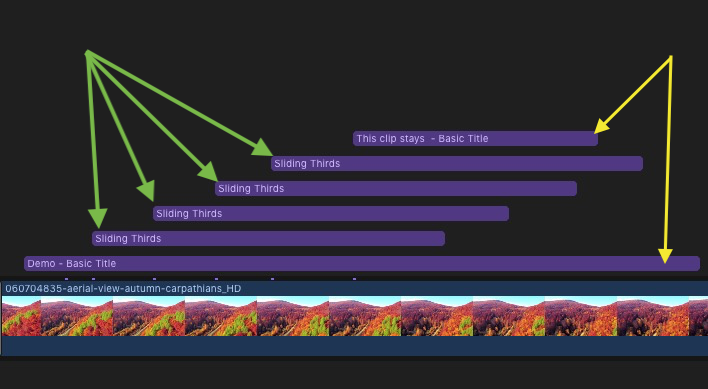
The above image shows the storyline section for the Demo: Offset Stacking section of the demo video.
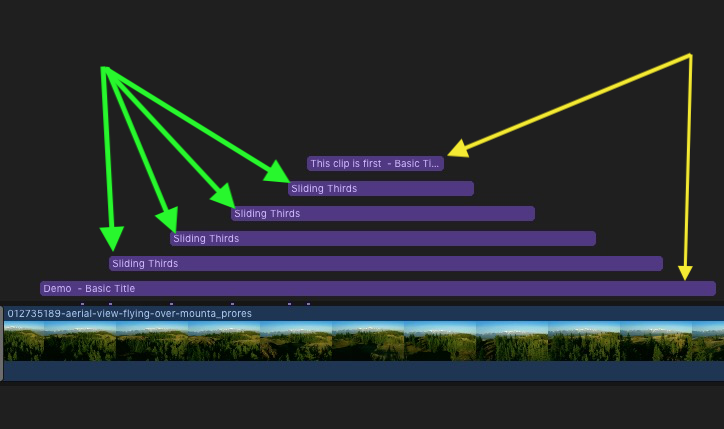
Pyramid Stacking
In the example below, there is a Basic Title (“Demo Pyramid Stacking” from the Demo video) on top of the storyline. Four Sliding Thirds titles have been stacked and retimed to form a pyramid shape, followed by another Basic title on top. The top Basic title remains stationary throughout the animations. The Demo Pyramid Stacking title text at the bottom of the stack is animated four times – once for each Sliding Thirds title added and resulting with the Demo … text moving off the right side of the screen upon the exectution of the fourth stacked Sliding Thirds. In this arrangement, when the topmost Sliding Thirds ends, the entire screen (accumulated titles below it and the storyline) will reset back the same displacement amount. When the third Sliding Thirds ends, the screen resets back another third distance, etc. until the storyline is restored to its normal appearance.
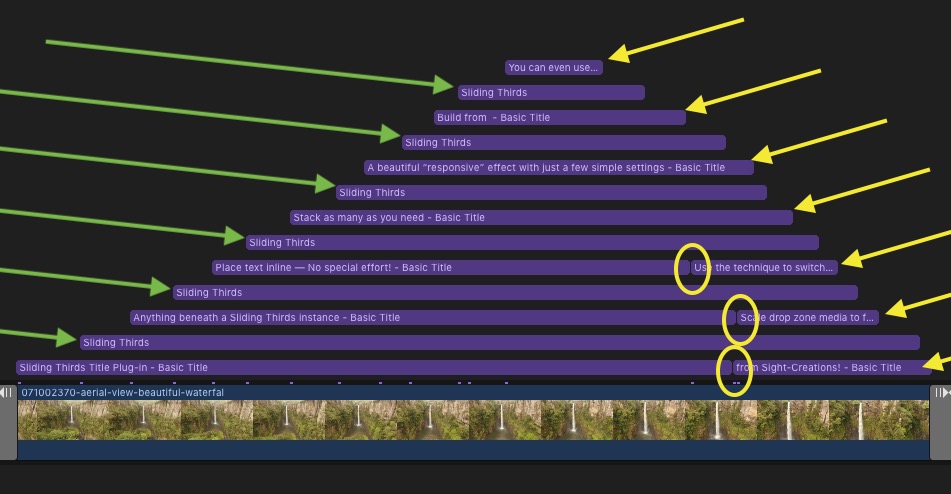
The example below demonstrates the use of interim text titles under the Sliding Thirds. The green arrows show the positions of Sliding Thirds titles and the yellow arrows highlight the positions of Basic Text Titles used to label the entire accumulated scene beneath each text entry. The yellow circles illustrate where titles were “bladed” and their content changes, so as the animation begins resetting to the normal storyline appearance, the titling has been changed to extend the messaging.
This example is taken from the section of the Demo video below beginning with the waterfall and sliding up six times.
Straight Stack
Add a Sliding Thirds title to the storyline and set the Horizontal or Vertical (or both) offsets to ±100. Hold down the Option key and drag upward to create a duplicate of the Sliding Thirds title. With snapping on, align the two titles together. Animation will now cover a 2/3 distance across the screen. Repeating this action will cover the screen with either panels, drop zones (in 1/3 sections) or, by making a compound clip, a full screen “reveal” effect with any other additional media placed anywhere below the compound clip.
Creating a Paneled Split Screen
Apply a Sliding Thirds title. Pick which panel to use and adjust its color. Leave Horizontal/Vertical Slides at 0. Option drag a copy immediately above the first one (which also duplicates color and panel choice). For the instance on top, set the Horizontal or Vertical Slide to 50%. To the instance on the bottom, adjust the drop shadow if used (Blur = 0 and Opacity =100% will create a solid line). Apply your titling or other media content to the solid color background portion of the screen:
Of course: you still have plenty of options for customization!
Sliding Thirds is an extremely useful, easy, and quick utility to perform perfectly executed animations by thirds — no keyframing required. If you work with television advertisement, this tool is a must have.