
Selectable List Item
Maintain a list of data, up to 100 data points.
Save as an Effects Preset to make the data list accessible to future sessions.
Multiple instances can be added to a single Title, Generator or other clips.
Use this to build interchangeable data titles.
Parameters
Data Category can be used to *classify* the data to be maintained in this effect. It doesn’t show in your video project, it is to be used only to label the category of the data entry items.
Data Point is the current data selection point.
Position is the location on the screen you need to text to appear. If you are using this effect on a title using other non-changeable text, you can use Position to set the location of the selectable data to appear as if it were part of the Title’s text. If you need assistance in lining up the baseline, turn on Show Guide. Hold the Option key while dragging Position X or Y to make “fine” adjustments to the position.
Show Guide will turn on a horizontal and vertical Line to assist in aligning the text to other parts of your clip or to other instances of Selectable List Item.
Data Entry is a text field where you will maintain your data *LIST*. A list *must* be lines of text ending with a “Return” (or Enter), in other words, separate lines for each data entry point.
You may load this up with 100 data points (there may be some flexibility in this, but don’t take it too much further).
Make sure the *last line* is blank (type a return after the last data entry line).
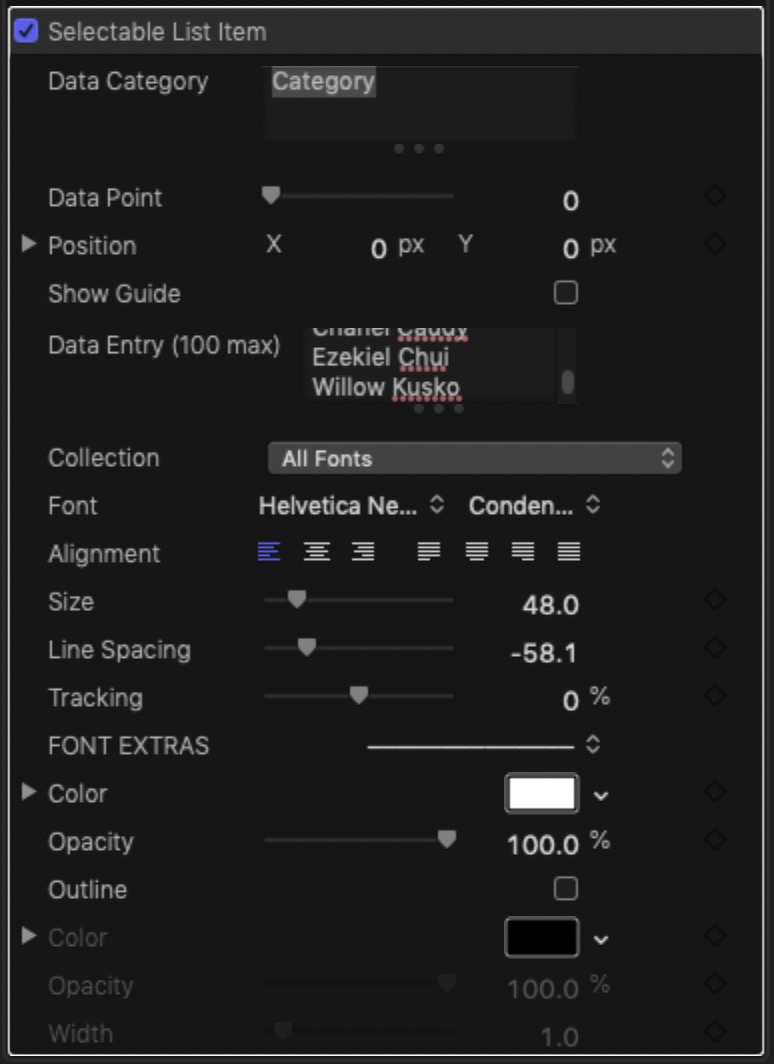
The rest of this effect’s parameters are formatting and text Color and Outline options.
Show Guide’s dual purpose:
Compressing the list —
A list is just that, it goes from a top line to a bottom line. This effect uses a “trick” to keep all the lines on the same baseline using Line Spacing.
Show Guide is to be used with the Line Spacing parameter when changing font options.
This effect is set up to use Helvetica Neue Condensed Bold as the default font and all the text entry lines will align with each other as they are selected.
You may change the font to anything you like, but once you do all the typographical features will change, including the line spacing which will need to be re-set up.
Choose your font and its size, then turn on Show Guide. Set the Data Point to show your last data entry (make sure the last text line is showing) and adjust the Line Spacing so that the bottom of the last text entry just touches the Guide line. All the lines in between should now line up exactly on the same base line as every other line and there should be no perceptible vertical movement from line to line.
Make sure you SAVE your work as an Effects Preset especially if you customize the font.
Lining up your Data Points with other video elements —
Most data points will have labels. For example: Name, Address, Phone Number, etc. Show Guide will assist you in placing the Data Point with their labels. Below is an example of using Selectable List Item with a Basic Title against a video clip background:

Using Selectable List Item:
Selectable List Item can be used as an internal database for interchangeable information as well as a subtitle (limit 100 lines per instance!) — but you can use as many Selectable List Item effects on one clip as you need and each one can be keyframed to show lines as their given time.
However, as designed, this effect is can be used with spreadsheet data.
Columns of data can be copied directly from Numbers into Final Cut Pro Selectable List Item effects. Spreadsheet data is most convenient to use because lines are already numbered and this can assist you in presenting the data in your FCPX project.

You can use a selection from multiple columns, just realize that the data will present as a single line and there will be no tab alignments, just spaces. In general, it will be best to use single column data and use more Selectable List Item effect instances and manually align them in the Viewer (with Show Guide turned on.)
But wait, there's more!
Included with this product is another effect called Select-A-Frame.
If you only use one Selectable List Item effect, it’s not a big deal to set the Data Point to show the information you need to display.
However, if you have more than one Selectable List Item effect attached to any clip (typically a title), it can be a lot of work to adjust the Data Point for each one.
You can keyframe all of the instances to progress through the list at the same time – automated, from 0 to 100 over the exact frames as each other. Set the storyline playhead at a start point and set keyframes on all the instances, then move the playhead at least enough frames to handle the number of entries you have used, and set the end keyframes.
Add Select-A-Frame to the clip. Select-A-Frame will freeze all animations to the frame that is set with the Playhead parameter.
You do not need to enter the Clip Length in order for this to work, but it will help give you a visual indicator if you turn on Show Dashboard. You can enter time exactly like you would for the timer in the Viewer.
If you create a title the exact size of your data, then the selected frame will indicate the Data Entry Data Point. Since you don’t have to be exact and can make your clip longer in frames than the amount of data stored, you can simply use the visual guide in the center. The vertical bar represents how far along you’ve gone.
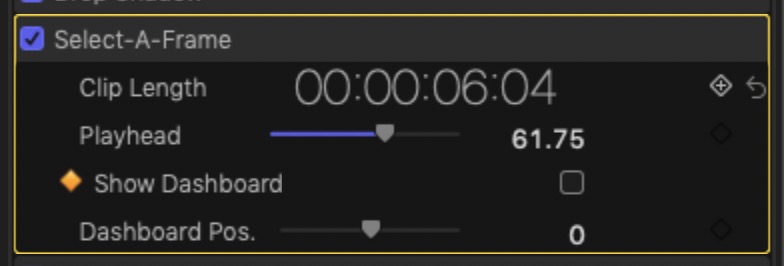

The Dashboard Pos. parameter can be used to move the dashboard left or right on the screen to get it out of your way (most of the time).
Select-A-Frame can be used for other visual effects in FCPX besides controlling Selectable List Items effects. For example, you can keyframe Playhead to progress normally, then “flatline” it to create a still frame, then keyframe the end to continue. You can Retime your clips longer to account for the time you freeze, it makes no difference to the quality of the video. Select-A-Frame was made from S•C Retimer (all the extra automated animation features have been removed and simplified).
Keep up to date with Sight-Creations on Twitter.
A good place to see all of my effects as well as several tutorials and other demonstrations in use is on my YouTube channel.