
Perfect Character Write On with Motion (Mask Tracing Technique)
To create a custom character write on effect that looks as if the typographic strokes appear as if they were painted (or inked) on, all you really need to do is create a Mask consisting of Paint Stroke Tool or Bezier curves that match the curves, then animate the First Point Offset or Last Point Offset within the mask.
Using this technique, you’ve probably run into this problem:
To create a custom character write on effect that looks as if the typographic strokes appear as if they were painted (or inked) on, all you really need to do is create a Mask consisting of Paint Stroke Tool or Bezier curves that match the curves, then animate the First Point Offset or Last Point Offset within the mask.
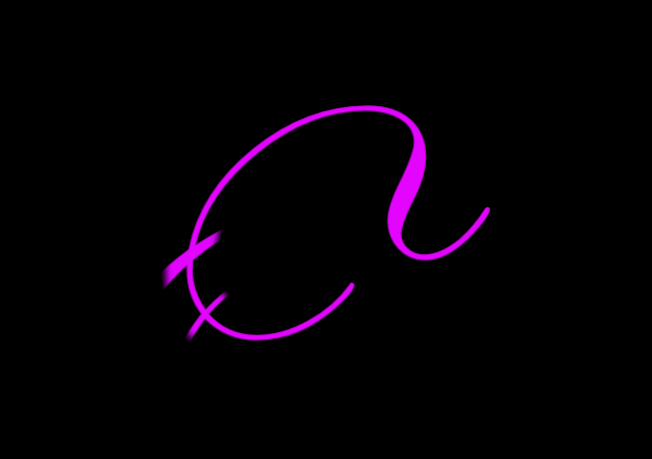
Using this technique, you’ve probably run into the problem shown in this image:
The effect works well until you have to run across the cross strokes.
You probably can’t create a perfect mask for this type of character write on effect for calligraphic characters. You can, however, control how the Bezier line you’re using to write on handles narrow and thicker strokes, which might be a world easier than trying to manage type of masking you’re trying to do.
Look at this image (click to pop up):

The actual ‘H’ character (Edwardian Script), which will be used as the mask for the curved line write-ons, is cyan colored. The “curve” (magenta) that will be used to write-on is currently overlaid for this demonstration. See that little onscreen control near the top of the curve? That is a Width Over Stroke “keyframe” setting. You can set the width of a curve at (almost) any point in the curve (see comment about Motion being snotty below). The curve Brush Type must be set to either Airbrush or Image (you can use different shaped “pen tips” with image). When using Airbrush, tighten up the Brush profile somewhat and for either, set the Spacing to 5%.
There is a feature with either of these curve types that becomes available — the Stroke inspector, and the controller you need to deal with is the Width Over Stroke parameter:

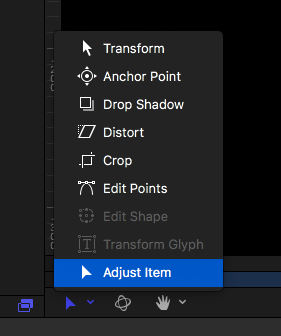
It is often easier to add control points in this “widget” (right click on the graph line and “Add Keyframe”). However, if you want to work directly in the canvas, once the shape is created and exists in the Layers list, you can go to the tool menu and select Adjust Item.
The default setup is a control point at the start and end points. If, while Adjust Item is selected, you double click or Option-click on different points of the line, new control points will be added (Motion can be snotty about this and switch back to Edit Points… that’s why adding points in the Width Over Stroke inspector may be easier). Once control points are added to the line, they can be easily re-positioned on screen (they’ll follow the line without changing it, other than the width)—with the control selected, click-drag the mouse left or right to move it along the line.
To adjust the width, click on one of the end points on the perpendicular lines and drag to control the line width. It is usually easier to start with a line that matches the thinnest parts and use width over stroke to widen later — easier to see the coverage.
Wherever there is a narrow crossing, create two “stop gap” controls on either side of the crossing, then another in between that can resize the width of the line to exactly match the crossing. You only have to be “neat” at the crossing lines — everything else can be larger than necessary.
This video tutorial will help you *optimize* your Bezier line workflow through this technique:
Inside Motion: Mastering Bezier Curves (the Pen Tool—applies to all vector graphics apps) – YouTube
There is no faster or easier way to deal with bezier curves (and the fewer the points used, the smoother the line will look.) However, in this case, once you get the overall bezier line in place, it will be often easier to Add Points on the line to help center them in wider regions where necessary… you’ll see what I mean… and fortunately, when Motion Adds Points, it compensates the control points to match the line already in place (usually) and its “direction”. It’s usually just a matter of adding the extra point and dragging it to line it up — no need to readjust the control points.
If you want this effect to look “perfect”, this is about the only way I know to pull it off. (PS – you can afford to go slightly thinner through the first passing of a crossing – when the line comes back around for the second pass, anything that covers it will fill the difference.)
Notice the bottom loop on the yellow stroke—it is quite convincingly done.
(I didn’t have the time to spread out the write-ons… so they were animated all at once.)