Ticker Tool Plus User Guide
Final cut pro comes with a Ticker title. Check it out — it’s terrible!
Description
Ticker Tool Plus is an effect designed as a Graphics Package specifically designed to create this kind of infographics. This effect can be used in combination with other clips, Titles and Generators, or with multiple applications to a single clip (whatever “type” that might be!)
Parts: Label, Label “tag” (background), Ticker Text, Ticker Track and an accessory Backing (background) to create or expand the Lower Third properties of this effect.
The Label is the overall controller of position. The label tag, track, ticker text and background all follow the position of the Label Text.
Each part: Label Text, Label Tag, Ticker Text, Ticker Track and Background have their individual fill color and outline properties available for customization, as well as the opacities of each.
Text is set to All Caps by default, but this option can be turned off if desired.
Whatever settings you make to Ticker Tool Plus, including *keyframed animation* and masks can be saved as a virtual *new effect* by saving it as an Effects Preset. Even if you use *more than one* Ticker Tool Plus on any kind of clip (video, image, Title or Generator), and even if you add other effects to enhance TTP (like Drop Shadow) your Effect Preset will save ALL of these instances, with all keyframed animation and any Masks used into a single Effect Preset for future use. In that future, find your save Effect Preset and add it to a clip instead of Ticker Tool Plus and have all your work, as you designed it, applied as easily as adding any other effect. Final Cut Pro restores all of the original effects used with all their settings, keyframes and masks without you having to do anything further except update the text to the new application.
[Note: Effects Presets are not transferable without all of the original effects used in their “assembly” — they are not standalone effects, just a database used to reassemble the work you’ve already done.]
Ticker Tool Plus comes with a “blank” Title template called Ticker Track. This is not an adjustment layer, it is a container for Ticker Tool Plus as well as any other *effects* you may wish to add that act on Ticker Tool Plus. For example, you can add a Hue/Saturation effect and animate the Saturation to go from a B&W look to full color and back. If you have other third party effects to “glitch”, you can try some of those. [There are not a lot of effects that ship with FCP that offer creative options, but if you find some third party effects, or make your own in Motion, they can be applied to make interesting, creative changes to TTP.]
There is a very subtle black outline around the text, more of a gradient actually, added to help smooth the text and help make characters more distinguishable against various colored backgrounds.
There are a couple of minor inconveniences when creating this type of effect AS an effect. 1) text is not editable in the Viewer and 2) text will not have access to the Text Inspector parameter options. All of the most important text options are included with the Ticker Tool Plus effect parameters, but this makes the number of parameters available somewhat intimidating (it takes up the whole inspector column!) Don’t be alarmed, they’re broken down into related sections.
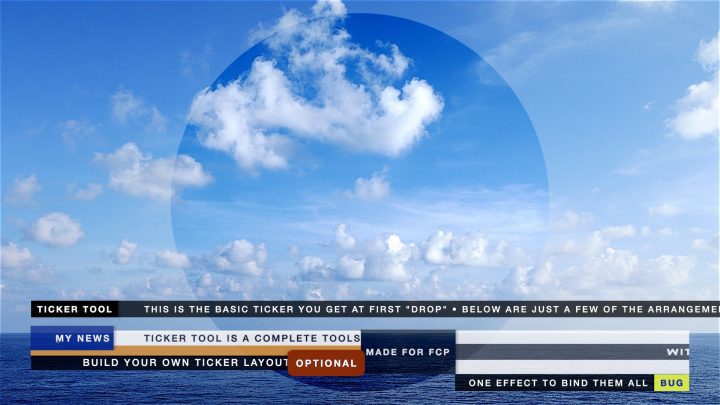
ticker tool plus is designed according to news tickers, containing a label “tag” and a “track” to highlight the animated text. A “straight” simple ticker is possible with this effect.
You can add as many tickers to a clip as you need without stacking all of them up on the storyline as happens with Titles. Since TTP is designed as an effect, you have access to Effects Masks and the Shape Masks available — for each individual TTP effect — will be quite convenient if making a multi-track effect. If you saw the “coming soon” video (link) the example tracks are all masked to “half screen” to fit them all together.
If you need to have a ticker run longer than the length of your individual clips, a Ticker Track title is provided. This is similar to an adjustment layer, but it will not work as one. It is designed to have effects applied to that only work within the track and not affect any clips below it in the storyline other than the effects of the Ticker and effects applied to those (yes, other effects can be applied to a Ticker).
You are encouraged to spend some time designing your tickers, then saving them as an Effects Preset to be used again later so you won’t have to redesign tickers every time you add a new one to your projects.
There are quite a lot of available parameters available to customize your ticker’s appearance, but they are broken down into sections to make handling them easier.
The top section contains the important parameters.
When you first add a ticker, the label tag is on the left and the track goes out to the right past the edge of the screen.
You position the ticker on-screen by clicking on the label text (you should see a rectangle outline when it is selected) and dragging the label to the position you want.
If you want the label on the right side of the screen, click the Reverse Ticker Layout option and the track will go out to the left side. Notice that the ticker text remains in the same location onscreen.
The ticker text begins near mid-screen to make it convenient to see your changes. When you are ready to have it scroll, select the Offset Ticker Text option and the text will be repositioned to just off-screen on the right (regardless of the Reverse Ticker Layout setting). Text always goes Right to Left. (If I make a Left to Right version, I will include it with the package.)
You have the option to hide the Label completely with the Hide Label option and use the Ticker Tool in an edge-to-edge format. If you need to shorten the track, use a Shape Mask because the track part of the graphic is just a background for the text and not a container for the text.
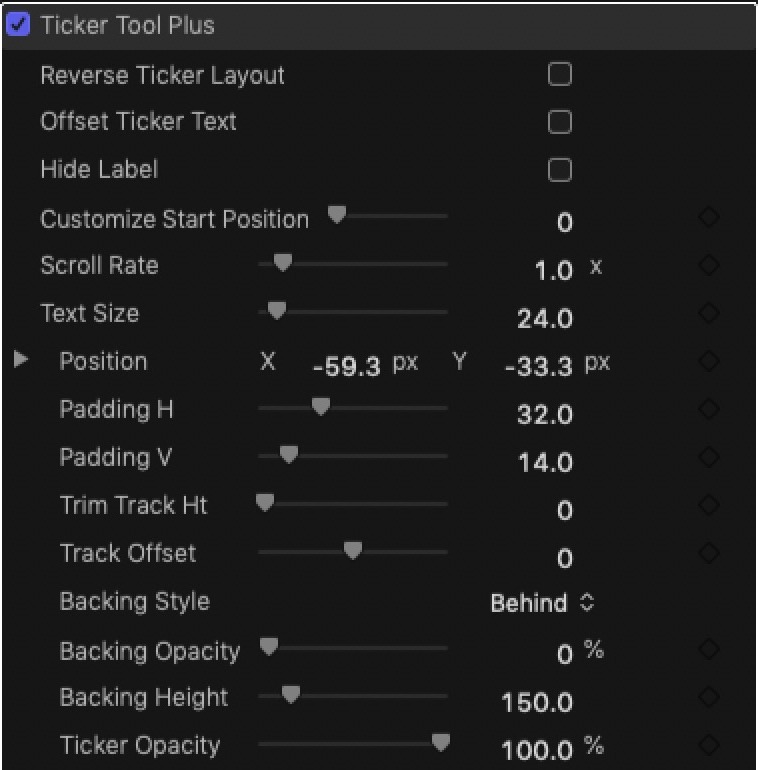
Customize Start Position allows you to override the automatic Offset Ticker Text and/or it’s starting position if you do not use the Offset Ticker Text option. Customize Start Position may also be used to keyframe the ticker text animation (and you can manually accomplish a LTR movement of the text for Arabic and other LTR languages.) In the demo video, the Credits animation keyframes to animate both Customize Start Position and the Track Offset parameter.
Scroll Rate is set to 1.0 by default. Scroll Rate is an animation multiplier as scrolling the text is controlled by behavior. Setting Scroll Rate to 0.0 will freeze the text at its location facilitating keyframed LTR text animation or for use in a “Bug” type setup (label plus information that does not animate as in a type of “identifier tag”).
Text Size may be another inconvenience because both texts, Label and Ticker Text, are constrained to be the same size regardless of fonts used. This may mean that your choices for fonts will be somewhat limited. There is a Baseline (in the TICKER PROPERTIES section) control for the Ticker text to assist in vertically aligning the its text to however the Label is designed.
Position will both reflect where on the screen you move the label text to, which can be done with a click and drag of the mouse. It may also be used directly in the inspector to fine tune positioning or even animating the position of the Label. Remember that wherever the Label goes, ALL else follows.
Position > Z is available, but it is not recommended for use with this effect.
Normally, the Label Tag automatically adjusts its size depending on the Text Size.
Padding H (Horizontal) and Padding V (Vertical) are used to create space around the Label Text and grow (or shrink) the Label Tag. The size of the Track will automatically adjust with Padding V as well.
Use Trim Track to bring the track back down to the size of the ticker text if using Padding V “decoratively”.
Track Offset is provided to move the track background left (negative direction) or right (positive direction) if you plan to animate on or off its appearance onscreen. The Label Tag side is “protected” and the track can be animated to “disappear” into the Label tag. You can go the other way as well, but it will just look weird, although you could animate the track from offscreen to connect to the label tag on the other side before you cause the text to appear. (It’s an option.)
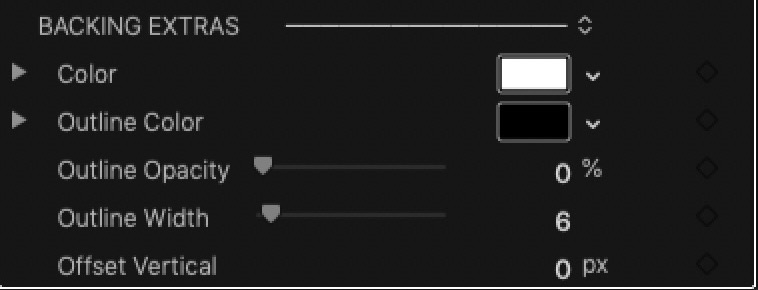
As stated, there is a background called Backing available. Backing exists behind all the other elements and is used to create a “lower third” look to this effect. By default, backing spans the entire screen horizontally and from the top of the Track to the Backing Height setting (default 150 pixels). You can change this to line up with the bottom of the Track by selecting Under from the Backing Style menu. In the Backing Extras at the bottom of the inspector is an option to Offset Vertical from these selected default positions. It may be an extra step, but it is the price paid to have everything linked together for positioning. Offsetting horizontally is not really realistic because the width of the backing is very wide, beyond two lengths of the project size. If you need to trim the sides of Backing, use a Shape Mask.
By default Backing is hidden (Backing Opacity is 0%). “Dial” in the Backing Opacity to achieve a blended look, or set it to 100% for a solid color background.
You can use Ticker Tool Plus with the Backing as a background for other Titles you may want to add to your infographics.
The Ticker Opacity parameter controls the Opacity of *everything* in this effect. Use it to fade in/out or provide uniform semi-transparency over the entire effect.
That’s all of the “heavy lifting” parameters used with this effect. The rest are “tweaks” for the Label, Ticker, and Backing properties.
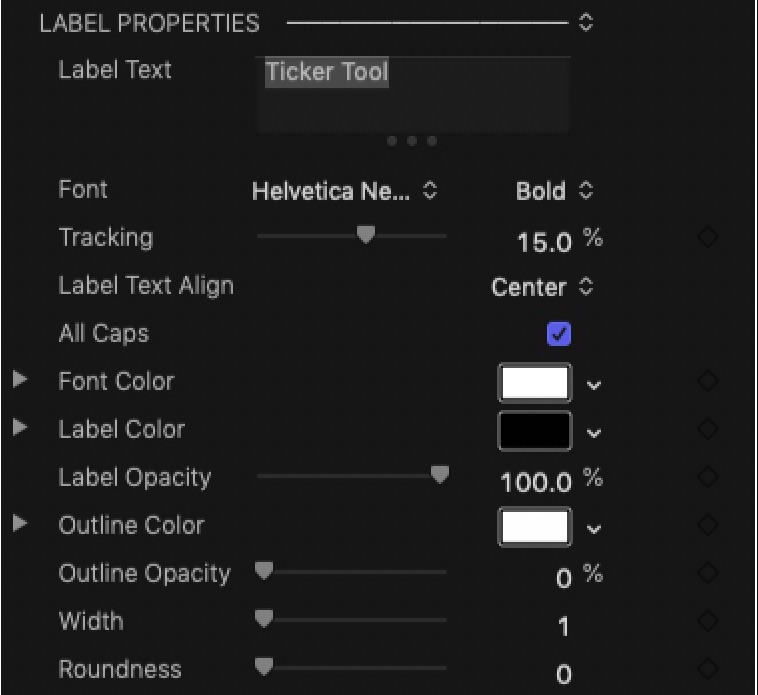
In the case of Label and Ticker, you have the Texts available. You will have to enter your texts in these textboxes since, as mentioned, you will not be able to edit the texts directly in the Viewer.
You have Font selection options, Tracking (it helps to add some tracking to various texts to assist in readability while under motion).
The Label has an option to Align its text Left, Center or Right. In general, Center will be the best option, but if you want to create the appearance of the text closer to one edge of its Tag or the other, then you have that available to you. Use with Padding H to enhance the effect.
The Label Properties section also has a “Roundness” option. By default, the Label Tag is a Rectangle. Roundness will allow you to created Rounded Rectangles. (Ovals, which are possible, are not recommended, but those are possible as well.)
Both Texts are set to All Caps by default. The option to turn that off is included.
Color and Outline options are included (along with their respective opacities). Outline Width is excluded from the Ticker Properties since wide outlines are not really attractive … at all! They just make the track look “clunky”.
In the Backing Extras section, the only “odd” parameter is the Offset Vertical discussed above.
There you have it. There are many, many options to assist in customizing *your* personalized ticker effect. Don’t be intimidated! Most of the options are just padding because font options are not available from an Effect.
Design your tickers just once, then save as an Effect Preset. You can create dozens and dozens of variations. Give the Presets names that will help you remember what they’re for!

Keep up to date with Sight-Creations on Twitter.
A good place to see all of my effects as well as several tutorials and other demonstrations in use is on my YouTube channel.