
Impact 3D OSC title for FCPX
Make it Count!
The original Impact title grows up.
- Real 3D text!
- Font Selection, Size, Align, Depth, Weight and Material
- View parameters: Position, Rotation, Lighting
- Onscreen control of XY and Z Rotations
- Dust adjustments: Text Heaviness, Dust Amount and Color controls
- Background Color and Opacity
Parameters:
Show OSC is on by default assuming you want to rotate the text. You can toggle its appearance by clicking on the checkbox for its parameter.
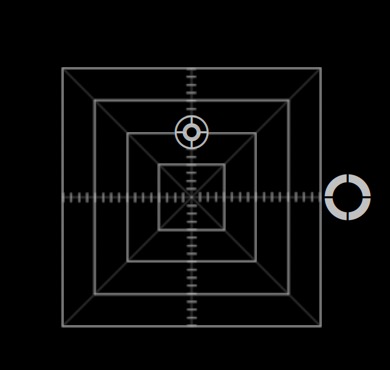
This is the appearance of the OnScreen Control. The square background area with the smaller control represents rotations around the XY axis and the larger control represents the rotations around the Z axis.
Moving the control across the horizontal direction controls the rotation around the Y (vertical) axis and moving the control up or down along the vertical direction controls the rotation around the X axis.
The small target OSC will rotate the text in two directions (Y/X) at once. When keyframing rotation, remember to set initial keyframes for Y-Rotation and X-Rotation at the same time. The target boxes delineate 25%, 50%, 75% and 100% of the rotation from center. (More info in the View parameters section below)
Following the Show OSC parameter is a Text Box for entering your Title text. The reason this title is set up this way is onscreen text editing has been disabled so that accidental “damage” cannot happen by changing aspects of the effect in the Text Inspector. Titles you make with this effect should be only one line, two at the most. All the text controls you will need are available to you in Impact 3D’s inspector. Provided is a Font Selection of all the fonts included in Final Cut plus the font “Impact” (should be installed in all systems since Tiger). Font Size and Text Align(ment) are included.
The Character Depth parameter is used to change the 3D depth of the text characters. One of my favorite parameters is the Text Weight Adj. parameter which allows you to adjust the Font weight in either direction: finer or heavier.
Material is set for the Metal textures available in Final Cut Pro an no others. The text should look and feel “heavy”!
Since this is 3D text, the Front Edge has been provided to allow customization of the look. Edging picks up light differently and improves the perception of “metalness” of the text. Front Edge consists of the kind (Bevel, Round, Concave and Square provided) and the corresponding Width and Depth which can be used to widen or shrink the edge corners of the characters. The default is 4 x 4.
Inside Corners is provided in order to smooth out issues that might arise when adjusting the Text Weight. Straight may force some over-sharp corners in letters like ‘N’ and changing the Inside Corners to Round or Bevel may help make a better appearance.
This effect has an imaginary reflective surface at the point where the text stops its “drop”. A Shadow version of the text has been provided to give the appearance of a muted reflection. The Shadow is visible with a black background when the dust is animating. As the dust fades, so will the shadow. When the background is any lighter shade or color, the shadow will be visible when the text is at angles to the viewer.
Baseline is only provided to assist in aligning the text to the Dust IF necessary! The Baseline provides a vertical offset for the text. It is set at -100 by default since this position matches the Dust effect for most of the fonts provided. You should almost never have to make an adjustment, but it is available if you do. To make an adjustment, move the playhead to the point at which the text stops dropping and the dust appears. Try to adjust the value to center the text vertically within the dust “field”.
View parameters (position, rotation, lighting)
Position allows you to offset where the text appears in the Viewer. There is no OnScreen Control for this as it is not considered necessary for this effect. X and Y are easily available. It is not recommended that you dial down the disclosure triangle to use the Z parameter. To make text appear further back or closer, use the provided Font Size parameter. Animation in Z space is not recommended (but not impossible and should only be done after the dust has settled – pun intended).
Usually in a 3D title, you would find a Rotation parameter. This effect uses a custom OnScreen Control to adjust 3D rotation (shown above). The left-right orientation of the small OSC rotates the text around the Y-axis (vertical), therefore its parameter is shown first. The up-down orientation rotates the text around the (horizontal) X-axis. The range of values is from 0.0 to 1.0 which corresponds to -90º to 90º for each (only half the rotation ranges are provided for — there’s no point in looking at the back of the text in this effect!)
The Z-Rotation is a separate OSC with a range of 0º to 360º. Using the OSC will automatically wrap around the 0/360 “border”, but you will have to pay attention to the fact that the numbers won’t wrap in an animation. If you need to animation through 360/0 or in the other direction, you must keyframe the 0/360 mark and on the next frame move the control all the way around to finish the animation in the chosen direction.
Included in the View section are controls for a little lighting variation. Since the textures are metallic, they will reflect this lighting in interesting ways, and these parameters can be keyframed to animate the lighting (including the Light Color!) The Light Rotation 1 and 2 controls control the Y rotation and X rotation of the a “front” light, respectively. It’s effect on the text is always in relationship to the orientation of the text. Light Rotation 1 turns the light in the left-right plane and Light Rotation 2 directs the light up or down. The intensity can be clicked on and dragged to very high values. Env. Intensity relates to the “environmental” lighting. Some experimentation will be needed to make the best use of this feature, but some very dramatic lighting effects can be achieved with these available parameters.
The Dust section
By default, the text “drops” and stops on the “surface” when the dust is generated. The Obj. Heaviness parameter puts a bit of a displacement in the “strike”. At 100, there is a significant displacement. It’s not a bounce in that the text comes back over the surface, its that the text and the surface are “impressed” then immediately return to its normal position — more of a “cartoon” drop (although the text does not distort its shape as you would expect in a cartoon animation.) The effect can imply a significant weight to the text.
Dust Amount can be used to vary how much dust is kicked up on the strike, from very little to a massive amount. The Value parameter in the next section below can be used to “amplify” the effect of the dust by making it brighter.
The Hue, Saturation, and Value controls allow you to colorize the dust — usually to match the lighting effects you might have added. Increasing the Saturation will start adding in the color characteristics of the dust. The 0º Hue value is close to a yellow-brownish dust and works well with the Gold metal surface setting, or just to imply a more natural dust. This slight offset from the beginning of the “color circle” will affect the way you choose the coloring of the dust. Since Hue does not rotation through negative values, you will have to all the way to 330º for Reds. Yellows are around 0º (or 360º), Greens around 60º, Cyans around 120º, Blues around 150º, etc. The Value control will determine the brightness of the dust and the use of this is provided so that this title can be placed over lighter backgrounds than it was designed for.
Randomize Dust will change up the “patterns” of the dust. You can click on the circular arrows to generate new values… slightly different looks.
BG ELEMS section
Impact 3D, by default, is on a black background. You can change the background color to anything you like and set its Opacity to “bleed through” background clips or images in the storyline.
Tips
There are sound effects in the FCPX Sound Effects library that can be adapted to this effect. Perhaps the best one is Title Metal Hit 02, followed by any of the following: Title Metal Hit 01, Impact Metal, Crash Metal 2 and Impact Metal Hit Reverb 07.
There is a possibility that some banding can occur in exported video. This usually happens when the difference in brightness levels between the dust and the background provides too much contrast. The best advice is to adjust the brightness (Value) of the dust or darken the color of the background. To test for banding, export a short range of your storyline containing the Impact 3D effect. If you find objectionable banding, you will need to experiment with adjustments to the background and/or the dust lightness/color/saturation to make the banding less noticeable. Note that this generally only affects the exported video. ProRes 422LT or 422Proxy are fast exports and will be good indicators of the problem (that will show up in more highly compressed videos targeted to YouTube or similar services.) It seems the lighter the background, the more serious the problem will be and higher compressions in the exported video will make the problem worse. [The best solution seems to be: keyframe the Value from whatever its setting is, down to 0 at the end of the dust animation (length depends on Dust Amount setting). ]
Impact 3D requires FCPX 10.4.4 or later. See our compatibility document if you want to attempt to backdate this effect to a previous version of FCPX. It is estimated that this title effect can be backdated to FCPX 10.2.0. FCPX—Motion Compatibility.