Menu Close

SC KeyFX Tips

Dear User,

Thank you for your interest in SC KeyFX for Final Cut Pro. I have been working with these effects since early 2016 and it is my sincere belief that with these effects you will be able to go from a simple “cutter” to a special effects artist quickly and easily. The possibilities are virtually endless! As such, a single User Guide has proven somewhat impossible. These are easy to use effects, just dig in!

KeyFX effects are designed to exploit the Effects Masks feature of Final Cut Pro. Ironically, these effects will not work in Motion. They are grouped together as “Key” effects since that is their general behavior, however, there is no rule requiring the colors to be green or blue as in their respective screens. Any color can be selected and you may opt to use them full screen if you so choose. A range of colors can be selected (two hues can be chosen effectively; more than that will generally require the addition of another effect of the same kind (easily done by selecting the storyline clip and Copy > Paste Effects or command-option-V) then choosing other colors in subsequent additions.

scKeyer is the simplest and will probably be the least used effect of the set, however, it provides no distractions for the following guide.

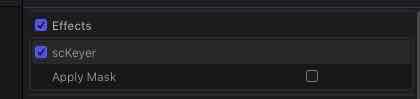
There are no parameters to scKeyer other than a checkbox to Apply Mask. A mask must be applied for this effect to do anything.

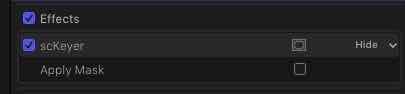
When you mouse over the scKeyer titlebar, a small icon will appear — this is the effect masks menu.

Clicking on the icon presents the available options:

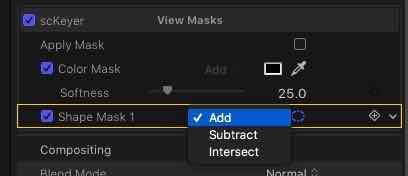
You get one color mask per effect added and as many shape masks as you need.

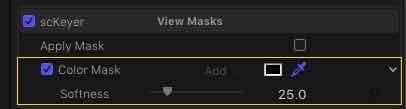
Adding a color mask provides an eyedropper tool. This is the same kind of tool you would find in a photoediting application and it is used in the same manner. Clicking on a color selects that color (in a very narrow range — about 2% — of the Hue-saturation-value of the color when Softness is set to zero). Holding the shift key down and clicking will add more color to the selection. Holding the option key is supposed to subtract a color from a selection, but that doesn’t always work. If you have to subtract color, you either have to start over or type Command-Z to undo the last “steps” (unlimited). It is possible to restart a selection by not holding any keys down and clicking on any color.

Once you have applied any type of mask, check the Apply Mask option if it exists or there will be an Opacity slider (as in scKey Fill). One exception is the scKey Gradient effect which starts with the gradient full screen so that you can design it. Then slide the Opacity to zero to select a mask and reapply opacity and Blend Mode.

Notice the blend mode (“Add”) – is grayed and cannot be changed (at this point).

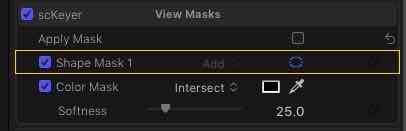
When adding a Shape Mask, it is added above the first added mask (in this case a Color Mask). Notice the Blend Modes. The shape mask takes on the Add mode and the color mask switches to the Intersect mode and it becomes selectable.

Masks can be rearranged by clicking on the name and dragging it to a new position in the mask list, which is helpful when blending modes need to be manipulated. Typically, you will want a Color Mask to be the dominant mask and the shape masks used as garbage mattes or to isolate the color mask to a specific region.

The options for blending are Add, Subtract and Intersect. Add is obvious – wherever an Add mask is applied, the selection will include all regions. Subtract will literally subtract the region of the lower mask from the upper mask. Intersect will act as a “limiter” meaning that the selected area will only fill the region provided by the lower mask on the list.

Multiple shape masks are going to get a little complicated. Just know you can manipulate the list order and masking to create the effect you need… generally.

If things get too compicated… add another effect and use an extra set of masks — all added effects “instances” are cumulative!

KeyFX are modular. Drag and drop what you need on your clips to add these functionalities. There are five “core” effects: scKeyer, scKey Fill, scKey Gradient, scKey Clone, and scKey Replace which is a great deal like a regular keyer except the background is filled with drop zone media instead of having to line up two clips one above the other. scKey Replace also makes it easier to match up the inside/outside mask edges through the utilization of blending modes and/or setting the original media to luminance values by removing saturation and adjusting the brightness — this makes scKey Replace a generally better option than scKeyer to use when using greenscreens or bluescreens (or any other color background that is more or less solid).

Some of the other effects in the set are “support” effects. Spill Suppress is useful to remove a color fringe (typically green from green screen media) or any other dominant color around the edge of a selection. Matte Magic will only work with scKeyer (and if you have to use it — it will require enlarging the media to a scale of 102% to remove a soft border that will appear.) scKey Sharpen is included (great effect – you’ll love it). Matte Shadow will allow you to provide a drop shadow for scKeyer effects (or scKey Fill if the blend mode is set to Silhouette Alpha).

The rest of the effects provided are for fun. They include Grain, scKey Cellular, scKey Checkerboard, scKey Grid, scKey Halftone, scKey Lens Flare, scKey Manga, scKey Op Art 1, scKey Rays, and scKeys Stripes (others might be included by the time these ship.) Most of these will be used to “fill” keyed out backgrounds or skies.

You will need to practice somewhat to get the best result from these effects. Below are a few tips and practice files have been provided so that you can begin to get a “feel” for the behaviors.

There are a few pattern generators provided for practice (they will be located in a “Practice” folder and will need installing as generators for FCPX).

Tips:

Set the Softness value of a color mask to 0 when making selections and try to capture as much of a color without “bleeding” into unwanted regions of the image. You will see what that means when you start pushing the amount of color needed. When bleeding begins to occur, back up with command-Z and try adding Softness before resorting to using shape masks if you can. Softness will work best with narrower ranges of color selection.

Try to make a color range selection with as few “clicks” as possible when shift clicking. Start on the light end of the scale and work towards the dark. For green screens, start close to the subject and work out. This might mean you will need to start the selection process a few times for the best result.

If you are removing a green (or blue) screen, try to collect as much of a hue as possible. Click and drag to gather as much of the green or blue as possible. Shift click to pick up the any remaining regions. The fringe areas around subjects will likely be the most difficult to eliminate (there’s usually always a fringe from backlight). Increase the scale of the Viewer and work as close to the subject as possible. Add modest amounts of Softness (too much will cause fade spots in your subject). Finish it off with Spill Suppress (more below). [If this sounds contrary to the previous tip, it is. Every clip is different and your approach may have to change depending on its quality.]

Clip quality will play a large part in your ability to make good selections. What is meant by clip quality? Bandwidth. Highly compressed video will have very little “latitude” to “push”. “JPEG artifacts” (blockiness) is a telltale indicator of low quality video. Your video clip might look “marvelous” just as it is, but try to change any feature like saturation or brightness might make those compression artifacts exceptionally obvious. High quality clips can be pushed quite a bit and no matter what you add into the image, it will look great. [“Push” is a term borrowed from photography whereby the base film is a specific ISO but pushed to be a higher ISO than rated and image “density” is compensated for by prolonging the development time. This technique is notorious for introducing more grain into the image. The “latitude” of film/processing is how far you can take this process and still obtain “acceptable” results. Measurement is usually done in “stops” or f-stop change from the normal for the film. As an example, ISO 400 film pushed to ISO 4800 is a push of ~3 1/2 stops. Tri-X ISO400 film had a latitude of ~4 stops or 16 times its base rating.]

Occasionally View Masks to check your progress. It is possible to Command-Z undo steps if you need to back up, or simply start over by releasing the shift key and making a selection.

Any number of KeyFX effects can be added to make more complex selections/effects. These effects are exceptionally “light weight” and will render in “respectable” time (quite fast actually). Experimentation is worthwhile! When re-coloring a scene, it will not be unusual to have several scKey Fill effects added to a clip. You may also want to sharpen color (or shape) selected areas (although the entire frame is the default), add a Lens Flare, or one or two of the other “fun” effects to your scene. Everything can be blended rather seamlessly into your scenes.

Use Softness to close any fringes that might occur. However, there will be plenty if instances where you will want a color mask to bleed over other colors and using color blend modes to smooth out the influence of the added color (or media).

scKey Fill - default video view - before
scKey Fill - colorized - after

Left image: original

Right image: 3 Fill, 1 Gradient, 1 Sharpen (water surface + beach regions) effects added (sample frame ©Pond5)]

Use blend modes to create more natural effects. For all the “fill” effects, try setting the Saturation to 0 and using a color with a blend. Use the Value (or Brightness) parameter to help match inside/outside mask regions to help remove any fringing that might occur.

Spill Suppress is typically used with a keyer. Spill suppress can be used with just about any of the effects. Using a green screen as an example, add Spill Suppress and use a Color Mask to select any remaining green in the image, then turn on the suppression. That will keep Spill Suppression from affecting any other color in the image. If using it for any other color than green, change the Color parameter to match the selection. Note: for green screens, it is often helpful to dial down the Color disclosure triangle and increase the Red value, particularly for areas around hair (even blonde!) It is frequently useful to pull the white tag down on Spill Contrast levels. Extra Contrast controls have been added to Spill Suppress to assist in de-fringing. Use after you’ve gotten the best results you can from the “top” parameters.

When using chroma screen media, better results will be obtained using scKey Replace. Place the “behind” media in the Drop Zone. Blending edges will become easier in the “all-in-one” effect.

If you need an “inside/outside” color masking setup, create a first color mask for the inside selection, then select the clip in the storyline (yellow outline) and Copy; then Option-Command-V (paste effects) to make a duplicate. Switch the masking of the pasted effect by selecting Invert Masks from the mask menu. For example: the “Pleasantville effect”, the main selection use a scKey Fill effect to isolate the preserved color regions then for the inverted copy, duplicate the Fill effect, invert the mask, set the opacity to 0% and set the Base Saturation to 0.

The color mask can effectively select two concurrent hues (although it has trouble with complementary [opposite] colors). Going beyond that will cause some unusual results (but if you need to – go for it!)

Any number of Shape masks can be added to constrain the selection or to mask unwanted areas of a selection.

Don’t forget that even more complex layering of effects can be accomplished with Compound clips.

Effects can also be added to Titles and Generators in Final Cut and parameters will be available in the Video inspector tab.

These are a powerful set of tools with which you can accompish all kinds of special effects right in the the Final Cut storyline, from simple color accents to the very sophisticated. No need to use any other application.

There are many other effects that ship with Final Cut that can use masking in the same way. Once you get used to dealing with effects on this level, they will never be the same again! As an example, try making a color selection with Gaussian (blur) and inverting it. Increase the blur Amount. Use a Shape mask inverted for a “tilt-shift” effect.

Enjoy your adventures!

F.X. Mahoney

sight-creations | fcpxtemplates.com

Available here: https://fcpxtemplates.com/sc-keyfx/


Keep up to date with Sight-Creations on Twitter and Facebook.

A good place to see all of my effects as well as several tutorials and other demonstrations in use is on my YouTube channel.