Photo Collage
Based on the Vintage Prints screen saver
Photo Collage is an Effect. It has a fixed timing of 1 minute maximum (that’s rather long in terms of video edits).
Photo Collage works with images or video, but designed for image “collections” gathered into a Compound Clip (sort of like an inline image sequence).
There is a way to Crop the image sizes along with an optional border (this is fixed though – it’s either on or off). Images do not have to be the same aspect as the project and adjusting the crop will not have any affect on areas that don’t exist.
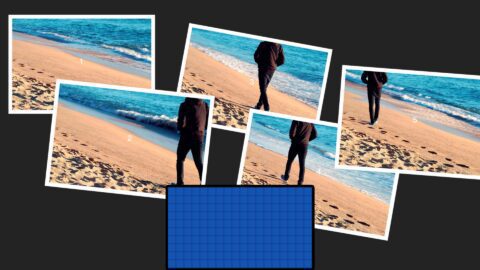
There are five images, and you can change which image goes into the placeholders (even duplicate them if you want).
You can change the stacking order of the images.
You can change the Position, Scale and Rotation of the images.
You can specify the “camera” roll and zoom.
You can specify the fade in / fade out times.
There is a built in HUD with OSCs to control Position, Scale and Rotation of all five images. (If you want to remove one or more images, just drag them off screen).
There’s an optional solid background. You can set the color and opacity of it.
You can save your personal preferences for the setup as Effects Presets.
Things you have to do to make this work correctly:
Tell the effect the length of time the clip is (best practice is to trim to the nearest second or half second and typing in the value).
Tell the effect how long each image length is (in frames). Recommendation is to set the number of frames to 5.
If you’re not using individual images, but simply a video clip, you can create a sequence of images picked through the clip (use the “picLength” parameter for the number of frames to “skip” [up to 300— make sure you have the media for it.]).
If you add more than 5 images (and you can add up to 25), there is a control that will let you got through and pick where the starting point is, so you can reuse a single collection and display it differently for multiple uses of the effect.
The parameters for position (Center), rotation (Angle) and Scaling are published and therefore may be keyframed to have them move on their own (besides the automated camera movement.)
Here’s the default look (more or less) when first applied:
Here’s what it looks like to edit the layout:
Example shows a video clip segmented into sequencial “shots”. Each frame has a number (so you can keep track of which image is which). Layer order has been changed (it should go from 1 down to 5; this has 1 and 3 on the bottom, 2 and 4 next level up and 5 on top.) Also shown: the “HUD” with OSCs: puck = position; “arm” = rotation and outer circle is scaling. The number overlays belong to the HUD and when it is hidden, so will the numbers be hidden too. HUD dimensions correspond with screen dimensions and placement. The grid makes it easy to line things up when necessary.
The default look (more or less) when first applied is displayed in the product image above (very much like the screen saver).
Example shows a video clip segmented into sequencial “shots”. Each frame has a number (so you can keep track of which image is which). Layer order has been changed (it should go from 1 down to 5; this has 1 and 3 on the bottom, 2 and 4 next level up and 5 on top.) Also shown: the “HUD” with OSCs: puck = position; “arm” = rotation and outer circle is scaling. The number overlays belong to the HUD and when it is hidden, so will the numbers be hidden too. HUD dimensions correspond with screen dimensions and placement. The grid makes it easy to line things up when necessary.
Example preparations
Images:
Add 5 to 25 images to the storyline. Select them all. Double click the Playhead clock and type ‘5’ and Enter. All the images will be 5 frames long. Add a Gap at the end and stretch it out for at least as long as you need the effect to run or longer. Then create a Compound Clip (Option-G).
Add Photo Collage. It’s defaults are the first image in your sequence on top followed by the next four. If you set the length of the images to a shorter or longer value, set the picLength parameter to the number of frames you chose.
If you have more than 5 images, you can set the picCount parameter to the picture number you want to start with.
Determine how long you want to have your effect run and resize/trim the clip to that length then type how long in the Clip End Time parameter (it doesn’t have to be exact, but it should be slightly shorter if not exact). This parameter sets how the Camera and Fade effects will work at the end of your effect.
Video:
You can use Photo Collage with video clips. Clips can be any length, but the effect will only work correctly for 1 minute.
Pick a video clip that has an action that can be sequenced in time by a series of stills (or not…) Use picLength to set a gap between which stills you want to apply. Length of time in frames divided by SIX(!) will give you the maximum value that picLength can be. Longer clips with more action between the picked frames will work best. Adjust the starting point by using picCount to offset the first frame chosen.
Photo Collage does the math! Each frame chosen is the number of the first frame, or (picCount – 1) + (the picture number * the picLength). The first image or video frame will always be picCount (there’s some other stuff going on behind the scenes where picCount = 2 is actually the number of picLength frames * 1; picCount = 3 = picLength * 2, etc.)
Keep up to date with Sight-Creations on Twitter.
A good place to see all of my effects as well as several tutorials and other demonstrations in use is on my YouTube channel.

