
Spot Marks the Text User Guide
A Title for Final Cut Pro
Requirements
This template will require FCPX 10.3.3 or higher due to the usage of the new Fill filter in Motion introduced this past January with version 5.3.2.
Development Note
When developing this Title, FCPX occasionally crashed (froze — spinning beach ball of death). No specific feature of the Title could be tied to the crashes and the instability may only exist on my personal system or there is a new feature in use that might be causing some instability. FCPX would freeze requiring a force quit. Restarting FCPX restored everything completely and no side effects occurred. The title and its parameters worked perfectly without further incidence. If you experience a crash, send the crash report to Apple and restart Final Cut (it will not automatically restart after a force quit). This title should be otherwise safe to use or it would not have been released.
Introduction:
This effect has been carefully crafted to allow a wide gamut of creative possibility. A “spot” animates through the center region outlined by two lines revealing the Title’s text. Two of the options are that the separation between the lines is user adjustable as well as the size of the spot which does not have to be a circle, it can be made into an oval. The title is crafted in such a way so that no matter what size the spot is, it always begins and ends the animation just beyond the bounding lines. This will make synchronizing multiple instances of the title in imaginative ways possible. Changing these dimensions will not effect the way the title works. You don’t have to worry that a smaller spot will mean a longer wait for it to appear or that the Line Separation will cut into the starting point of the spot.
This title is deliberately designed to be timed for 5 seconds. Need slower animation? Stretch out the title longer in time. Rapid “scrolling” can accomplished by shortening the time to 2-3 seconds.
This title has been designed with three lines of text. Default position for the specific font (Sinzano), font size, and the three lines has been set with Font Size, Line Spacing and Baseline. These three parameters will be very important to adjust when changing fonts, their size and the number of lines in use. Use the over and under lines as guides when making adjustments. These are easy adjustments to make — just use your eyes. You want the centering to occur at the midpoint within the title. If you double click on the title clip in the storyline, the playhead should automatically be set to the center frame of the title making these adjustments more precisely placed.
Parameters:
Build In/Out — The two lines that appear on the screen animate in the “build” portion of the template. You have the option of turning off this behavior for one or the other or both. This is useful if you have two or more instances of the title adjacent in the storyline and you want to animate the build in of the first and the build out of the second title, or have three in a row and turn off the build in and out of the middle instance. In this way, several lines of text can be animated inside the bounding lines with only the end titles providing the line animation on and off.
Align Text 2 Spot — By default, this title has a fixed location for the text and the spot reveals it as it passes through the effect. However, with this option checked, it is possible to the the text move with the spot.
Effect Y Position — By default, this title is centered in the frame, horizontally and vertically. This parameter allows you to create a lower (or upper) third by repositioning the title in the vertical space of the frame.
Spot Controls
Direction — Forward (default) and Reverse (moves from up to down).
Pause — By default, there is no (programmed) pause in the animation of the spot. With this option, you can have the spot pause when it reaches the center position within the animation.
Spot Radius — By default, the value is 212 pixels radius from its center. With this parameter, you are able to resize the spot to accommodate whatever text you require. You may also distort the spot into an oval shape: dial down the disclosure triangle on the left edge to access the width and height parameters.
Fill Spot With — Default is Color. However, you may select a Gradient.
Color/Gradient — This will depend on the Fill Spot With selection. If set to color, you will see a Color swatch with which you can set (and animate!) the solid color of the spot. When Fill Spot With is set to Gradient, you will see a gradient tool here. If you require partial opacity of the spot, use the Gradient and the Opacity controls built in.
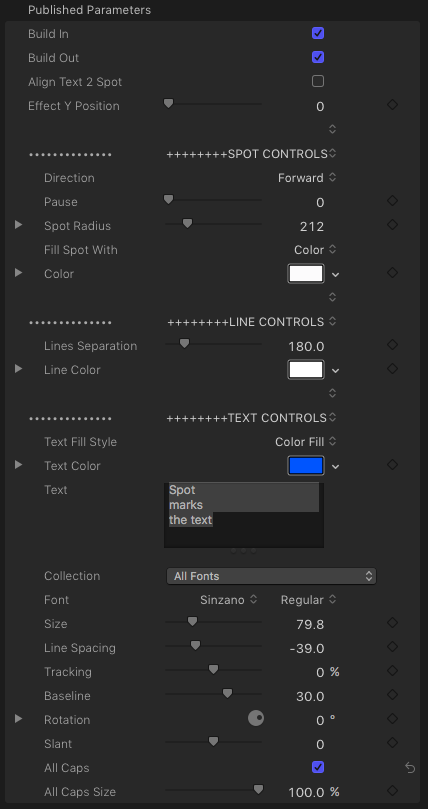
Text Controls
These parameters are placed here for your convenience. These same parameters are also available in the Text Inspector (except Text Fill Style and Collection).
Text Fill Style — By default, this option is set to Color. The other option is Cut Out which essentially fills the text with whatever the background media is in the storyline.
The default font for this effect is Sinzano. It is available to all users of Final Cut Pro.
Collection — If you organize your fonts in Font Book into collections, this is a convenience to finding the font you want by going directly into that collection. The Font menu will only display those fonts within that collection. The collection “All” will show all your installed fonts from the font menu.
Line Spacing — When using this parameter, be careful to select all the text so that Line Spacing is evenly applied. Otherwise, Line Spacing can be used to vary the spacing between lines any way you wish.
Tracking — used for spreading out the characters (increases kerning uniformly).
Baseline — This title is set up for three lines of text and centered according to the Sinzano font characteristics. If you use only one or two lines (or more than three), use this parameter to bring the text back to the center within the two horizontal lines. Note: this parameter has no effect when Align Text 2 Spot is active.
Rotation — Rotation is included for effect. When used with Slant, it makes a very interesting variation.
Slant — See Rotation.